打造一个简单的 iOS App CI 系统
目录
除了 Xcode Cloud,你还有别的选择。
本文介绍如何在 macOS 上使用 fastlane 来帮助你打造一个简单的 iOS App CI 系统。
在安装 fastlane 之前
与 macOS 系统自带的 Ruby 环境隔离
fastlane 对 Ruby 的最低要求是 2.5 及以上版本。虽然 macOS 自带 Ruby 环境,但强烈建议单独配置个 Ruby 环境,与系统自带的 Ruby 环境隔离。Ruby 官方有给出管理多版本 Ruby 的 方法,我个人常使用的是 rbenv。
使用 bundler 管理 gem
使用 bundler 管理 gem,这能确保团队协作时 gem(cocoapods 和 fastlane 等) 版本的统一。举个例子,如果团队成员的 cocoapods 版本不统一,Podfile.lock 这个文件经常会出现不必要的改动。
跟 cocoapods 管理 pod 类似,bundler 通过 Gemfile 来安装所需的 gem。
本文所使用的 Gemfile 内容为:
source "https://rubygems.org"
gem "fastlane", '2.195.0'
gem "cocoapods"
值得一提的是:要在 bundler 管理的环境下,执行相关 gem 的命令,得加上 bundle exec 的前缀。对 bundle exec 命令的详细介绍,请参考这篇 文档。
使用 fastlane 接管应用的打包和上传 App store 流程
1. 设置打包参数
一般地,在开始打包之前,需要的参数为:
- 代码对应的分支名:
branchName(String Type) - App scheme 名:
scheme(String Type) - 是否需要上传 App store:
deployToProd(Boolean)
其他的参数,可以根据自己的需要来设定。
2. 自动同步签名证书和 Provisioning Profile
fastlane 的 match 可以帮助在多台 macOS 设备自动同步签名证书和 Provisioning Profile。match 支持以多种方式存储签名证书和 Provisioning Profile,如存在 Git 仓库中、存在云上(Azure、Google Cloud 和 AWS)等。
一般地,会选择使用 match 把签名证书和 Provisioning Profile 加密保存在 Git 仓库上。此时,为了安全,match 会提醒你设置一个密码,这样在新的 macOS 设备上同步证书信息时,会提示输入密码,提高数据的安全性。
在 match 初始化配置完毕后,敲以下命令,可以同步三种导出方式对应的证书信息至本地,然后重启下 Xcode,点进 Signing & Capabilities 查看是否生效。
bundle exec fastlane match appstore
bundle exec fastlane match development
bundle exec fastlane match adhoc
虽然 match 的文档上写明:第一次初始化 match 前,建议使用 match nuke 命令来清理现有的签名证书和 Provisioning Profiles,但经验而谈,最好是用 match 管理签名证书和 Provisioning Profiles 的这套做法在组内成功推广开来之后再用 😜。
3. 更新代码
根据第一步获取的 branchName,在 ruby 脚本内执行 git 命令即可。
4. 安装 Pod 依赖
fastlane 的 cocoapods 可用来安装 iOS 工程的 Pod 依赖,指定 Podfile 的路径即可。
podFilePath = File.absolute_path("../").to_s
# install_dependencies
cocoapods(
	clean_install: true,
	podfile: podFilePath,
	verbose: true,
	repo_update: true
)
5. 清除 Xcode 缓存
fastlane 的 clear_derived_data 可用来清除 Xcode 缓存。
6. 开始打包
fastlane 的 gym 可用来执行 Xcode 打包命令。
gym(
	workspace: workspaceName, # 以 .xcworkspace.xcworkspace 结尾的 iOS 工程名
	scheme: fullScheme, # iOS 工程的 scheme 名
	export_method: exportMethod, # 所选的导出方法,与 fastlane match type 有关
	silent: false,
	clean: false,
	output_directory: ipaOutputPath,
	output_name: iPAOutputName,
	suppress_xcode_output: true,
	include_symbols: false,
	include_bitcode: false,
	build_path: fastlaneBuildPath,
	archive_path: archivePath,
	derived_data_path: fastlaneDerivedDataPath,
	buildlog_path: logPath,
	analyze_build_time: false,
	destination: "generic/platform=iOS"
)
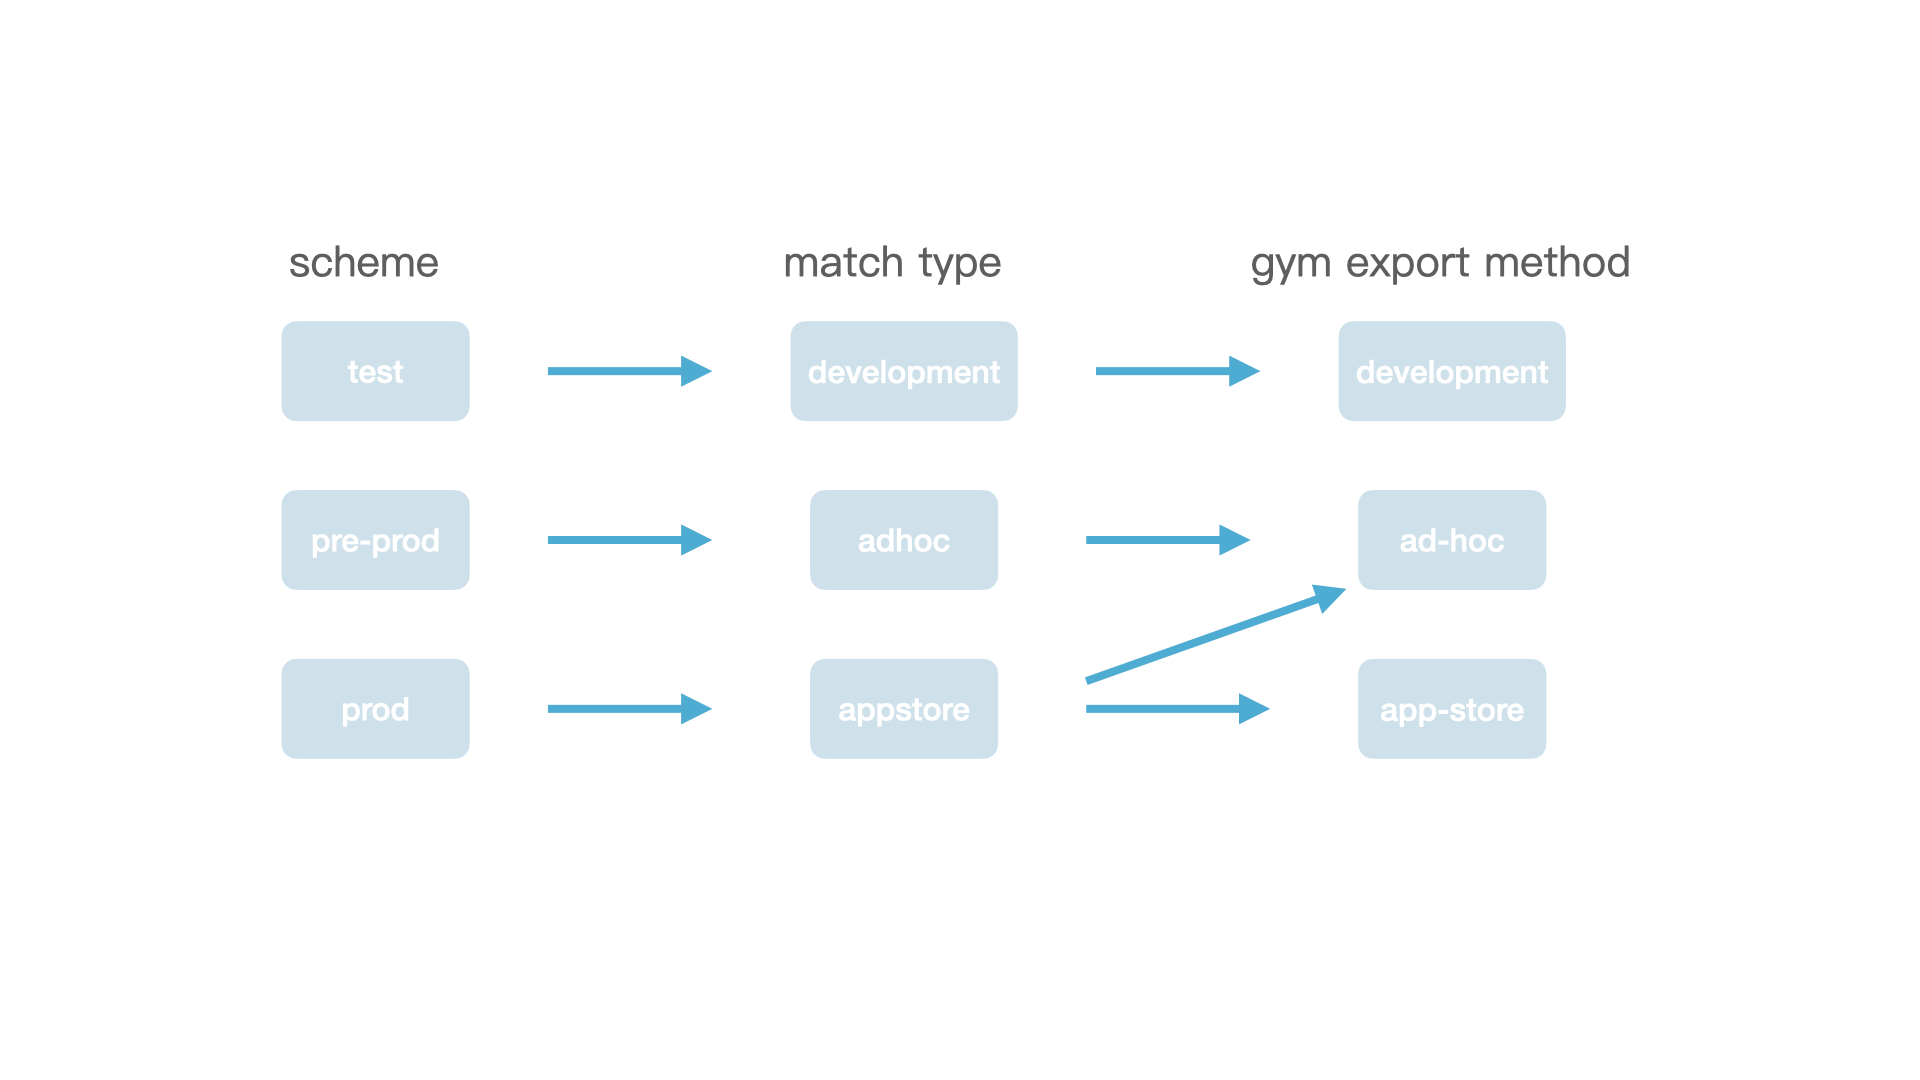
iOS App scheme、match type 和 gym export method 三者之间可能对应的关系如下图所示:
7. 上传至 App store
fastlane 老式的做法是用 Apple ID 的账号密码去登陆 App store connect,这样不光得设置一大堆环境变量,如下:
FASTLANE_USER = "sunsetwan@gmail.com"
FASTLANE_ITC_TEAM_NAME = "Sunset Technology Co. LTD"
FASTLANE_PASSWORD = "xxx"
app_identifier = "com.sunset.test"
SPACESHIP_2FA_SMS_DEFAULT_PHONE_NUMBER = "+86xxx"
FASTLANE_APPLE_APPLICATION_SPECIFIC_PASSWORD = "xxx"
而且登陆态一般只能维持两个礼拜。一旦过期,得重新输入 Apple ID 两步验证发来的短信验证码,这一点是比较令人困扰的,会直接打断自动化的流程,且现在 Apple ID 一旦开启了两步验证,就没法关闭了。
现在推荐使用 App Store Connect API 的方式来完成 Apple ID 的认证授权。
主要的三个步骤如下:
- 用「账户持有者」权限的 Apple ID 登陆 App Store Connect,创建 API Key 文件(
.p8)。 - 把这 API Key 文件保存在 CI 机器上
- 使用 fastlane 的 app_store_connect_api_key 来完成验证。
参考代码:
desc "使用 App Store Connect API 的 deliver"
private_lane :swizzed_deliver do |options|
	ipa_file_absolute_path = options[:ipa_file_absolute_path]
	if ipa_file_absolute_path.to_s.empty?
		raise "ipa_file_absolute_path is empty"
	end

	app_connect_api_key_path = ""
	Dir.chdir("../app_connect_api_key") do
		searchPattern = "AuthKey_xxx.p8"
		files = Dir.glob(searchPattern)
		if files.empty?
			raise "Error: can't find AuthKey_xxx.p8\nsearchPattern: #{searchPattern}\nCurrentPWD: #{Dir.pwd}"
		else
			path = files[0].to_s
			app_connect_api_key_path = File.absolute_path(path)
		end
	end

	api_key = app_store_connect_api_key(
		key_id: "xxx",
		issuer_id: "xxx",
		key_filepath: app_connect_api_key_path,
		duration: 1200, # optional (maximum 1200)
		in_house: false # optional but may be required if using match/sigh
	)

	if api_key.nil?
		raise "api key is missing!"
	end

	deliver(
		ipa: ipa_file_absolute_path,
		skip_screenshots: true,
		skip_metadata: true,
		skip_app_version_update: true,
		force: true,
		api_key: api_key,
		run_precheck_before_submit: false
	)
end
最后,可以配合使用 Gitlab Runner,来自动触发上述构建流程。
CI 的核心是什么?
我带着这问题去读了下《Software Engineering at Google》的第 23 章节 Continuous Integration。我个人觉得这问题的答案是:
A CI system decides what tests to use, and when.
当然,我认为这里提到的 test 不一定就是单元测试,可能还包含 lint 工具的执行结果等。
我前阵子读 Kingfisher 源码的时候,发现它也有写不少测试代码。
于是,我找到 Jon Reid 写的《iOS Unit Testing by Example: XCTest Tips and Techniques Using Swift》,决定读一读,学习如何使用 XCTest。
其中有关 XCTestCase 的生命周期的介绍,令人印象深刻,记录于此。
假设我们要测试的类为 MyClass:
class MyClass {

    private static var allInstances = 0
    private let instance: Int

    init() {
        MyClass.allInstances += 1
        instance = MyClass.allInstances
        print(">> MyClass.init() #\(instance)")
    }

    deinit {
        print(">> MyClass.deinit #\(instance)")
    }

    func methodOne() {
        print(">> methodOne")
    }

    func methodTwo() {
        print(">> methodTwo")
    }
}
对应的测试代码 MyClassTests 为:
import XCTest
@testable import TestLifeCycle

class MyClassTests: XCTestCase {

    func test_methodOne() {
        let sut = MyClass()
        sut.methodOne()
    }

    func test_methodTwo() {
        let sut = MyClass()
        sut.methodTwo()
    }
}
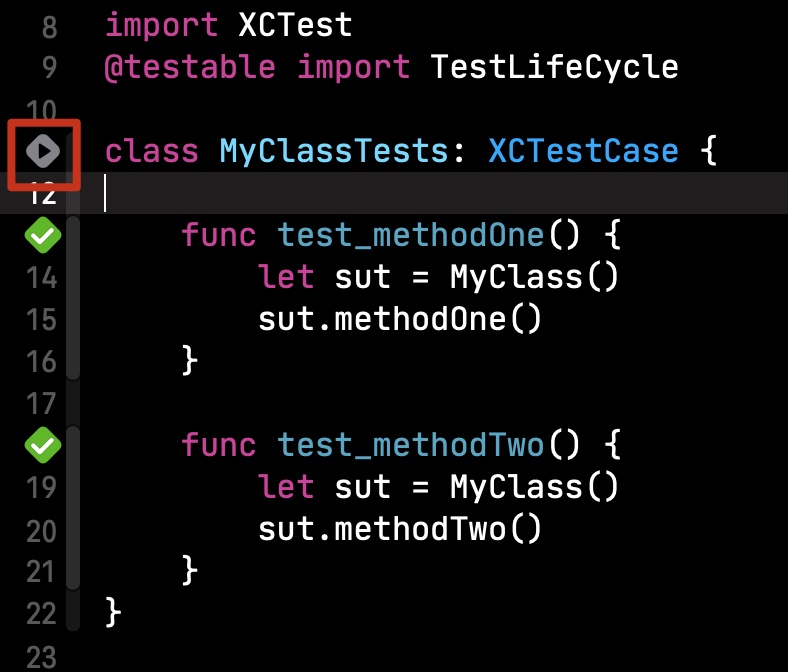
点击运行按钮,可以看到如下测试日志:
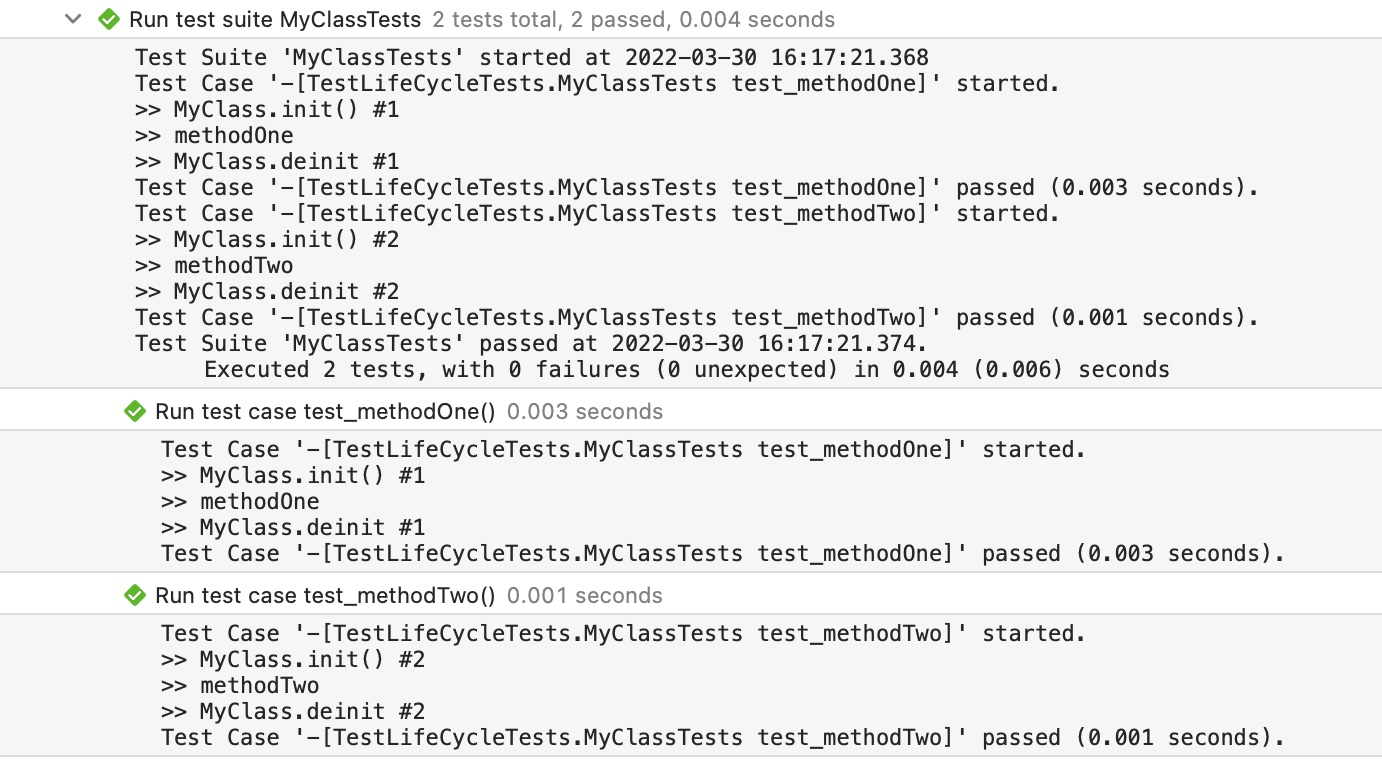
以 test_methodOne 方法为例,整个测试流程方法调用顺序为:
- MyClass.init()
- methodOne
- MyClass.deinit()
但 test_methodOne 方法和 test_methodTwo 方法内分别创建了一个 MyClass 实例,是不是代码有些重复了?
于是,我尝试这样优化:
class MyClassTests: XCTestCase {

    private let sut = MyClass()

    func test_methodOne() {
        sut.methodOne()
    }

    func test_methodTwo() {
        sut.methodTwo()
    }
}
再次点击运行按钮,得到如下测试日志:
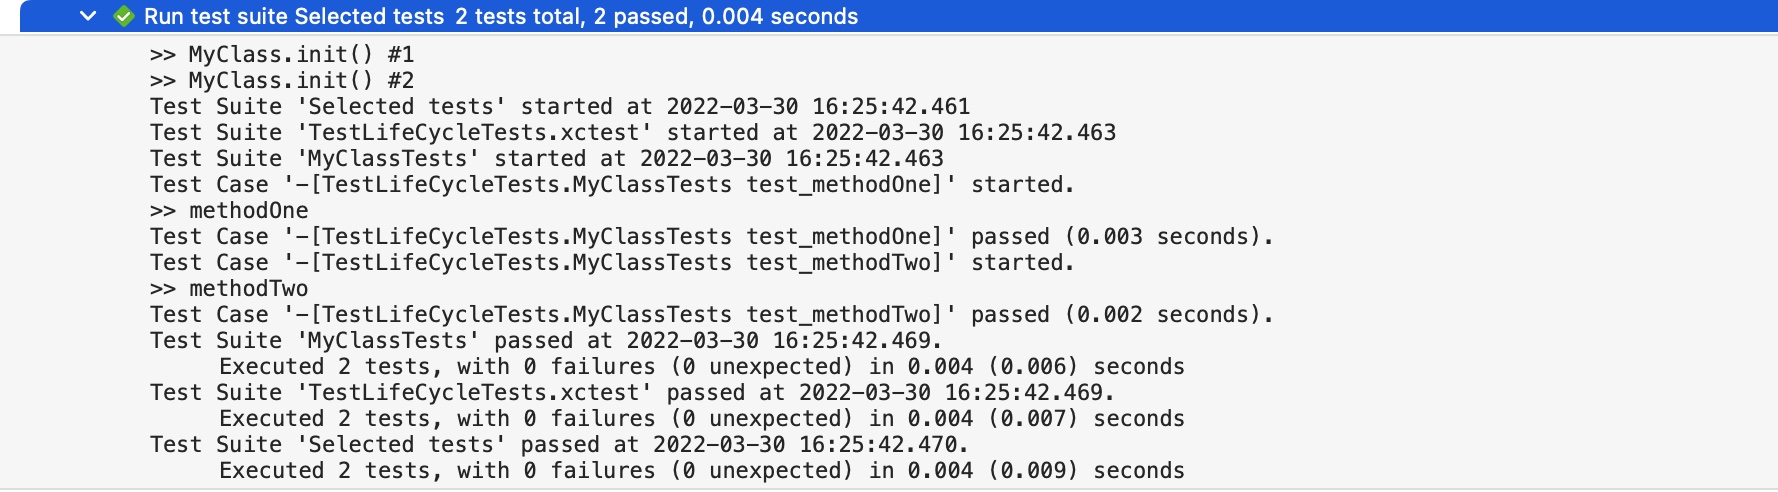
咦!怎么 MyClass.init() 调用了两次?MyClass.deinit() 方法没被调用!
在测试代码开始运行之前,两个 MyClass 的实例被创建了,且从未被销毁!这样会有两个潜在的问题:
- 如果
MyClass的init方法出了问题,测试代码很难捕捉到这个问题,因为问题发生的时机在任何测试代码运行之前。 - 如果
MyClass的deinit方法出了问题,测试代码很难捕捉到这个问题,因为这些对象未被销毁。
XCTest 是如何管理 Test case 的?
我想当然觉得是这样的:
- 创建
XCTestCase子类的实例对象 - 执行创建好的实例对象的测试方法
- 执行完毕,销毁创建好的实例对象
但实际上是这样的:
XCTest找到所有XCTestCase的子类- 在每一个这样的子类中,找到每个测试方法
- 对于每个测试方法,
XCTest会创建一个对应的实例 XCTest把每种XCTestCase的子类的实例包装成一个个的test suite- 当前四个步骤完成后,
XCTest开始运行测试代码。
以 MyClassTests 为例:
XCTest找到XCTestCase的子类:MyClassTests- 在
MyClassTests中,找到两个测试方法:test_methodOne和test_methodTwo - 创建两个
MyClassTests的实例 - 把这两个实例包装成一个
test suite
因为这两个 MyClassTests 的实例均持有 MyClass 属性,所以这就是 MyClass.init() 调用了两次的原因。
避免重复测试代码的正确方式
这里介绍 XCTest 的两个方法:setUp() 和 tearDown()
setUp() 方法是在每个测试方法执行前执行,用来设置初始状态。
tearDown() 方法是在每个测试方法执行后执行,用来执行清理动作。
使用这两个方法优化之后的代码:
import XCTest
@testable import TestLifeCycle

class MyClassTests: XCTestCase {

    private var sut: MyClass!

    override func setUp() {
        super.setUp()
        sut = MyClass()
    }

    override func tearDown() {
        sut = nil
        super.tearDown()
    }

    func test_methodOne() {
        sut.methodOne()
    }

    func test_methodTwo() {
        sut.methodTwo()
    }
}
再次点击运行按钮,得到如下测试日志:
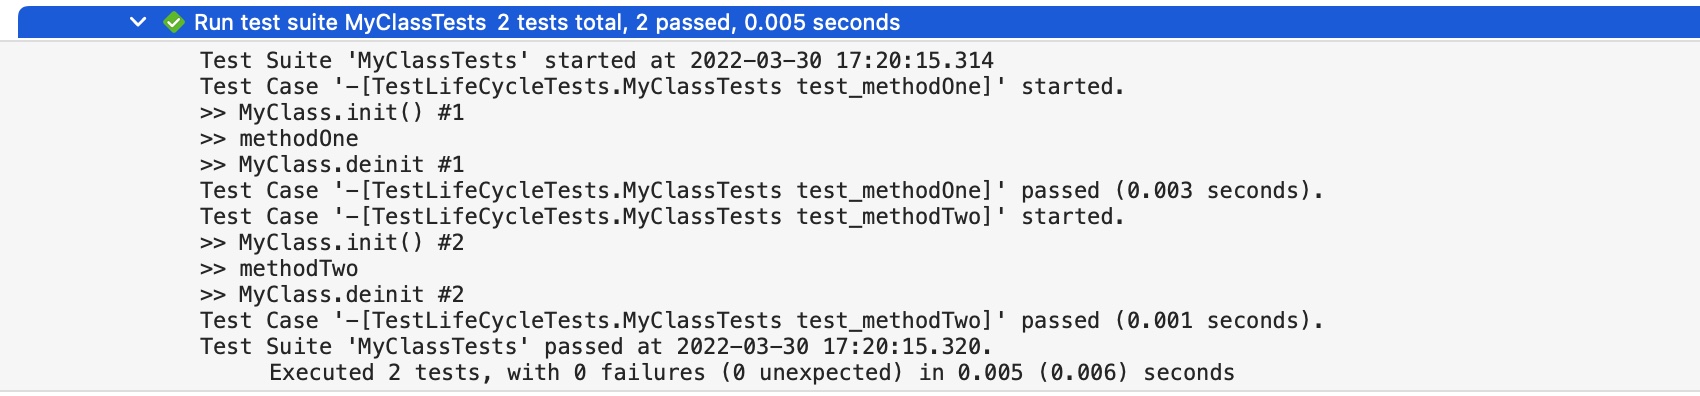
Wow!实例对象正确地初始化了,最终也被正确地销毁了!
fastlane 的 run_tests 可用来在 ruby 脚本中执行测试代码。
结语
有人会说:搞个 CI 成本太高了,但我觉得它带来的价值是高于成本的。
这里引用《Software Engineering at Google》第 23 章节的一段话:
CI leads to a more stable product and happier developer culture in which engineers feel more confident that “the system” will catch problems, and they can focus more on features and less on fixing.
让工程师们 focus more on features and less on fixing,这一点真的很重要。