Kingfisher 源码阅读(一)
目录
最近想了解如何设计一个简单的缓存系统,于是找了 Kingfisher 7.1.2 版本的源代码读一读,有些收获,记录于此。
缓存系统一般可分为:内存缓存(memory cache)和硬盘缓存(disk cache)。
内存缓存
内存缓存背后支撑的数据结构是 Foundation 框架中的 NSCache。
NSCache 有两个限制:countLimit 和 totalCostLimit。前者是表示能存储多少个对象,后者是表示缓存的容量有多大。但这两个限制是软限制——如果超过限制,NSCache 中保存的对象不一定会被及时地从其中移出。根据 官方文档,超过限制之后,对象的移出时机取决与 NSCache 背后的实现。
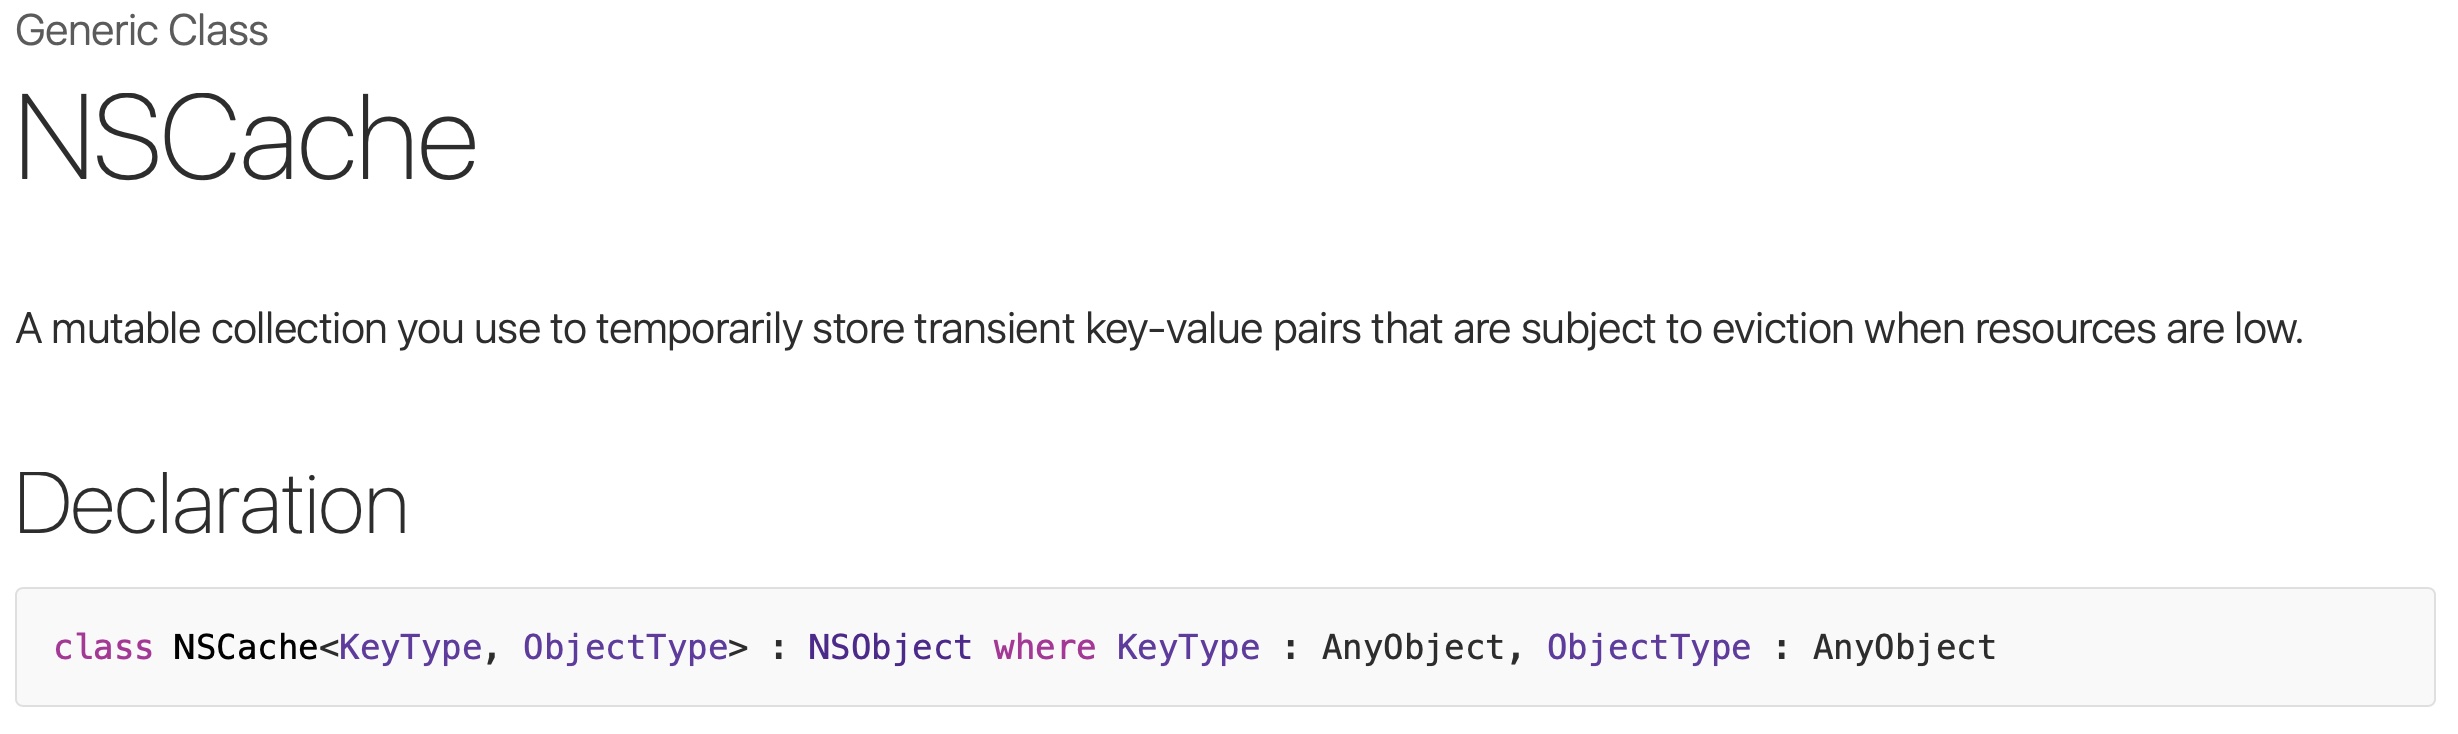
NSCache 是个泛型类,所以我们得定义好 KeyType 和 ObjectType。
根据声明的类型约束,KeyType 的类型得是一个类。一般地,类似 key 的数据结构会采用 String。而这里 KeyType 得是引用类型而不是值类型,所以我们会选择 NSString。但在 API 设计时,对外暴露的那一层 API,还是可以使用 String。到调用 NSCache 的 setObject(_:forKey:cost:) 方法时,再把 String 转为 NSString。之所以这样做,是因为值类型更符合当前场景的需求。
Kingfisher 中 ObjectType 对应的数据结构是这么设计的:
class StorageObject<T> {
    let value: T // 图片的数据
    let expiration: StorageExpiration // 过期策略
    let key: String

    private(set) var estimatedExpiration: Date // 预计到期时间

    init(_ value: T, key: String, expiration: StorageExpiration) {
        self.value = value
        self.key = key
        self.expiration = expiration

        self.estimatedExpiration = expiration.estimatedExpirationSinceNow
    }

    // 根据当前缓存对象的续期策略,进行续期。
    func extendExpiration(_ extendingExpiration: ExpirationExtending = .cacheTime) {
        switch extendingExpiration {
            case .none:
            return
            case .cacheTime:
            self.estimatedExpiration = expiration.estimatedExpirationSinceNow
            case .expirationTime(let expirationTime):
            self.estimatedExpiration = expirationTime.estimatedExpirationSinceNow
        }
    }

    var expired: Bool {
        return estimatedExpiration.isPast
    }
}
硬盘缓存
所谓硬盘缓存,就是把缓存数据写入一个文件。当对象写入硬盘缓存时,需要的是图片的数据,缓存的 Key 以及过期策略(StorageExpiration)。写入文件的 URL 是通过缓存的 Key 计算可得。
Kingfisher 利用操作系统中的文件系统来快捷地存储该缓存对象的 上一次访问时间 和 预计到期时间。Kingfisher 把写入文件的 创建时间 写为 上一次访问时间,把写入文件的 修改日期 写为 预计到期时间,还挺巧妙的 🤯。
let now = Date()
let attributes: [FileAttributeKey : Any] = [
    // The last access date.
    .creationDate: now.fileAttributeDate,
    // The estimated expiration date.
    .modificationDate: expiration.estimatedExpirationSinceNow.fileAttributeDate
]
do {
    try config.fileManager.setAttributes(attributes, ofItemAtPath: fileURL.path)
} catch {
    try? config.fileManager.removeItem(at: fileURL)
    throw KingfisherError.cacheError(
        reason: .cannotSetCacheFileAttribute(
            filePath: fileURL.path,
            attributes: attributes,
            error: error
        )
    )
}
当从硬盘中访问缓存时,Kingfisher 设计了 FileMeta 数据结构:
struct FileMeta {

    let url: URL

    let lastAccessDate: Date?
    let estimatedExpirationDate: Date?
    let isDirectory: Bool
    let fileSize: Int

    init(
        fileURL: URL,
        lastAccessDate: Date?,
        estimatedExpirationDate: Date?,
        isDirectory: Bool,
        fileSize: Int)
    {
        self.url = fileURL
        self.lastAccessDate = lastAccessDate
        self.estimatedExpirationDate = estimatedExpirationDate
        self.isDirectory = isDirectory
        self.fileSize = fileSize
    }

    func expired(referenceDate: Date) -> Bool {
        return estimatedExpirationDate?.isPast(referenceDate: referenceDate) ?? true
    }

    // 根据当前缓存对象的续期策略,进行续期。
    func extendExpiration(with fileManager: FileManager, extendingExpiration: ExpirationExtending) {
        guard let lastAccessDate = lastAccessDate,
        let lastEstimatedExpiration = estimatedExpirationDate else
        {
            return
        }

        let attributes: [FileAttributeKey : Any]

        switch extendingExpiration {
            case .none:
            // not extending expiration time here
            return
            case .cacheTime:
            let originalExpiration: StorageExpiration =
            .seconds(lastEstimatedExpiration.timeIntervalSince(lastAccessDate))
            attributes = [
                .creationDate: Date().fileAttributeDate,
                .modificationDate: originalExpiration.estimatedExpirationSinceNow.fileAttributeDate
            ]
            case .expirationTime(let expirationTime):
            attributes = [
                .creationDate: Date().fileAttributeDate,
                .modificationDate: expirationTime.estimatedExpirationSinceNow.fileAttributeDate
            ]
        }

        try? fileManager.setAttributes(attributes, ofItemAtPath: url.path)
    }
}
不难看出:FileMeta 的设计思路与 StorageObject 的设计思路有不少相似的地方。
缓存过期策略
Kingfisher 有设计 5 种缓存对象的过期策略:
public enum StorageExpiration {
    case never // 缓存对象永不过期
    case seconds(TimeInterval) // 缓存对象在当前时间点后的 x 秒过期
    case days(Int) // 缓存对象在当前时间点后的 x 天过期
    case date(Date) // 缓存对象在指定 Date 过期
    case expired // 缓存对象已过期
		...
		...
}
缓存续期策略
根据程序局部性的原理,被访问过的缓存很有可能再被访问一次,所以也应有缓存续期策略。
Kingfisher 有设计 3 种缓存续期策略:
public enum ExpirationExtending {
    case none // 不续期,到期时间不变
    case cacheTime // 以当前时间点为基础续期
    case expirationTime(_ expiration: StorageExpiration) // 以指定到期策略续期
}
无论是内存缓存还是硬盘缓存,默认的缓存续期策略均为:cacheTime。
缓存清除策略
内存缓存清除策略
内存缓存的清除策略分为两种:
- 系统控制:超过
NSCache的“软限制”,系统自动清除。 - 自己控制:定期扫描已缓存的对象,移出已过期的对象。
对于缓存系统来说,策略 1 是可能有负面影响的,因为系统可能会清除一个仍未过期的对象,从而降低了缓存的命中率。可行的解决办法是:提高 NSCache 的 totalCostLimit。然而这会导致缓存对象所占用的内存变大,需要自己把握这之间的平衡。
内存缓存的对象默认的有效期是 5 分钟。关于策略 2,Kingfisher 设计了一个 timer 来周期性(默认周期为 2 分钟)地清除过期的缓存对象。
cleanTimer = .scheduledTimer(withTimeInterval: config.cleanInterval, repeats: true) { [weak self] _ in
    guard let self = self else { return }
    self.removeExpired()
}

...
...

public func removeExpired() {
    lock.lock()
    defer { lock.unlock() }
    for key in keys {
        let nsKey = key as NSString
        guard let object = storage.object(forKey: nsKey) else {
            keys.remove(key)
            continue
        }
        if object.estimatedExpiration.isPast {
            storage.removeObject(forKey: nsKey)
            keys.remove(key)
        }
    }
}
硬盘缓存清除策略
硬盘缓存的对象默认的有效期是 7 天,其清除策略是自己控制的。
类似地,Kingfisher 也对硬盘缓存的可用容量做了限制,通过 sizeLimit 来控制。但 Kingfisher 在对象存入硬盘缓存时,并未对对象的大小做检查。我的猜想是一方面是可以提高缓存的命中率,另一方面是有其他更好的时机来核查缓存对象的大小,并清除过大的缓存对象。
如果 app 进入了 UIApplication.State.background 状态,Kingfisher 就会开始清理过期的对象和过大的缓存对象。
清理过期对象的做法:
func removeExpiredValues(referenceDate: Date) throws -> [URL] {
    let propertyKeys: [URLResourceKey] = [
        .isDirectoryKey,
        .contentModificationDateKey
    ]

    let urls = try allFileURLs(for: propertyKeys)
    let keys = Set(propertyKeys)
    let expiredFiles = urls.filter { fileURL in
        do {
            let meta = try FileMeta(fileURL: fileURL, resourceKeys: keys)
            if meta.isDirectory {
                return false
            }
            return meta.expired(referenceDate: referenceDate)
        } catch {
            return true
        }
    }
    try expiredFiles.forEach { url in
        try removeFile(at: url)
    }
    return expiredFiles
}
清理过大对象的做法:
func removeSizeExceededValues() throws -> [URL] {

    if config.sizeLimit == 0 { return [] } // 0 意味着无大小限制。

    var size = try totalSize()
    if size < config.sizeLimit { return [] }

    let propertyKeys: [URLResourceKey] = [
        .isDirectoryKey,
        .creationDateKey,
        .fileSizeKey
    ]
    let keys = Set(propertyKeys)

    let urls = try allFileURLs(for: propertyKeys)
    var pendings: [FileMeta] = urls.compactMap { fileURL in
        guard let meta = try? FileMeta(fileURL: fileURL, resourceKeys: keys) else {
            return nil
        }
        return meta
    }

    // 以上一次访问时间从大到小排序,最近访问的对象排在最前。
    pendings.sort(by: FileMeta.lastAccessDate)

    var removed: [URL] = []
    let target = config.sizeLimit / 2
    while size > target, let meta = pendings.popLast() {
        size -= UInt(meta.fileSize)
        try removeFile(at: meta.url)
        removed.append(meta.url)
    }
    return removed
}
「清理过大对象」这个说法其实有些模糊,更准确地说明是:如果当前硬盘缓存的容量大于 sizeLimit,则根据对象的上一次访问时间进行排序,最近访问的对象排在前面。Kingfisher 的做法是:从最不经常访问的对象开始删除,直到当前存储的对象的总大小缩减至一半及其以下,才停止删除。这是经典的 LRU 缓存淘汰算法。
出错处理
Kingfisher 把自身模块内的错误细分为 5 类,分别为:
/// Represents the error reason during networking request phase.
case requestError(reason: RequestErrorReason)
/// Represents the error reason during networking response phase.
case responseError(reason: ResponseErrorReason)
/// Represents the error reason during Kingfisher caching system.
case cacheError(reason: CacheErrorReason)
/// Represents the error reason during image processing phase.
case processorError(reason: ProcessorErrorReason)
/// Represents the error reason during image setting in a view related class.
case imageSettingError(reason: ImageSettingErrorReason)
每类错误还会携带对应出错原因。从错误的分类,可以大致看出 Kingfisher 分为图片下载模块、图片缓存模块、图片处理模块等模块。
其他
在阅读 Kingfisher 缓存系统相关代码时,我还发现了其他值得学习的代码,一并记录。
网络请求重试机制
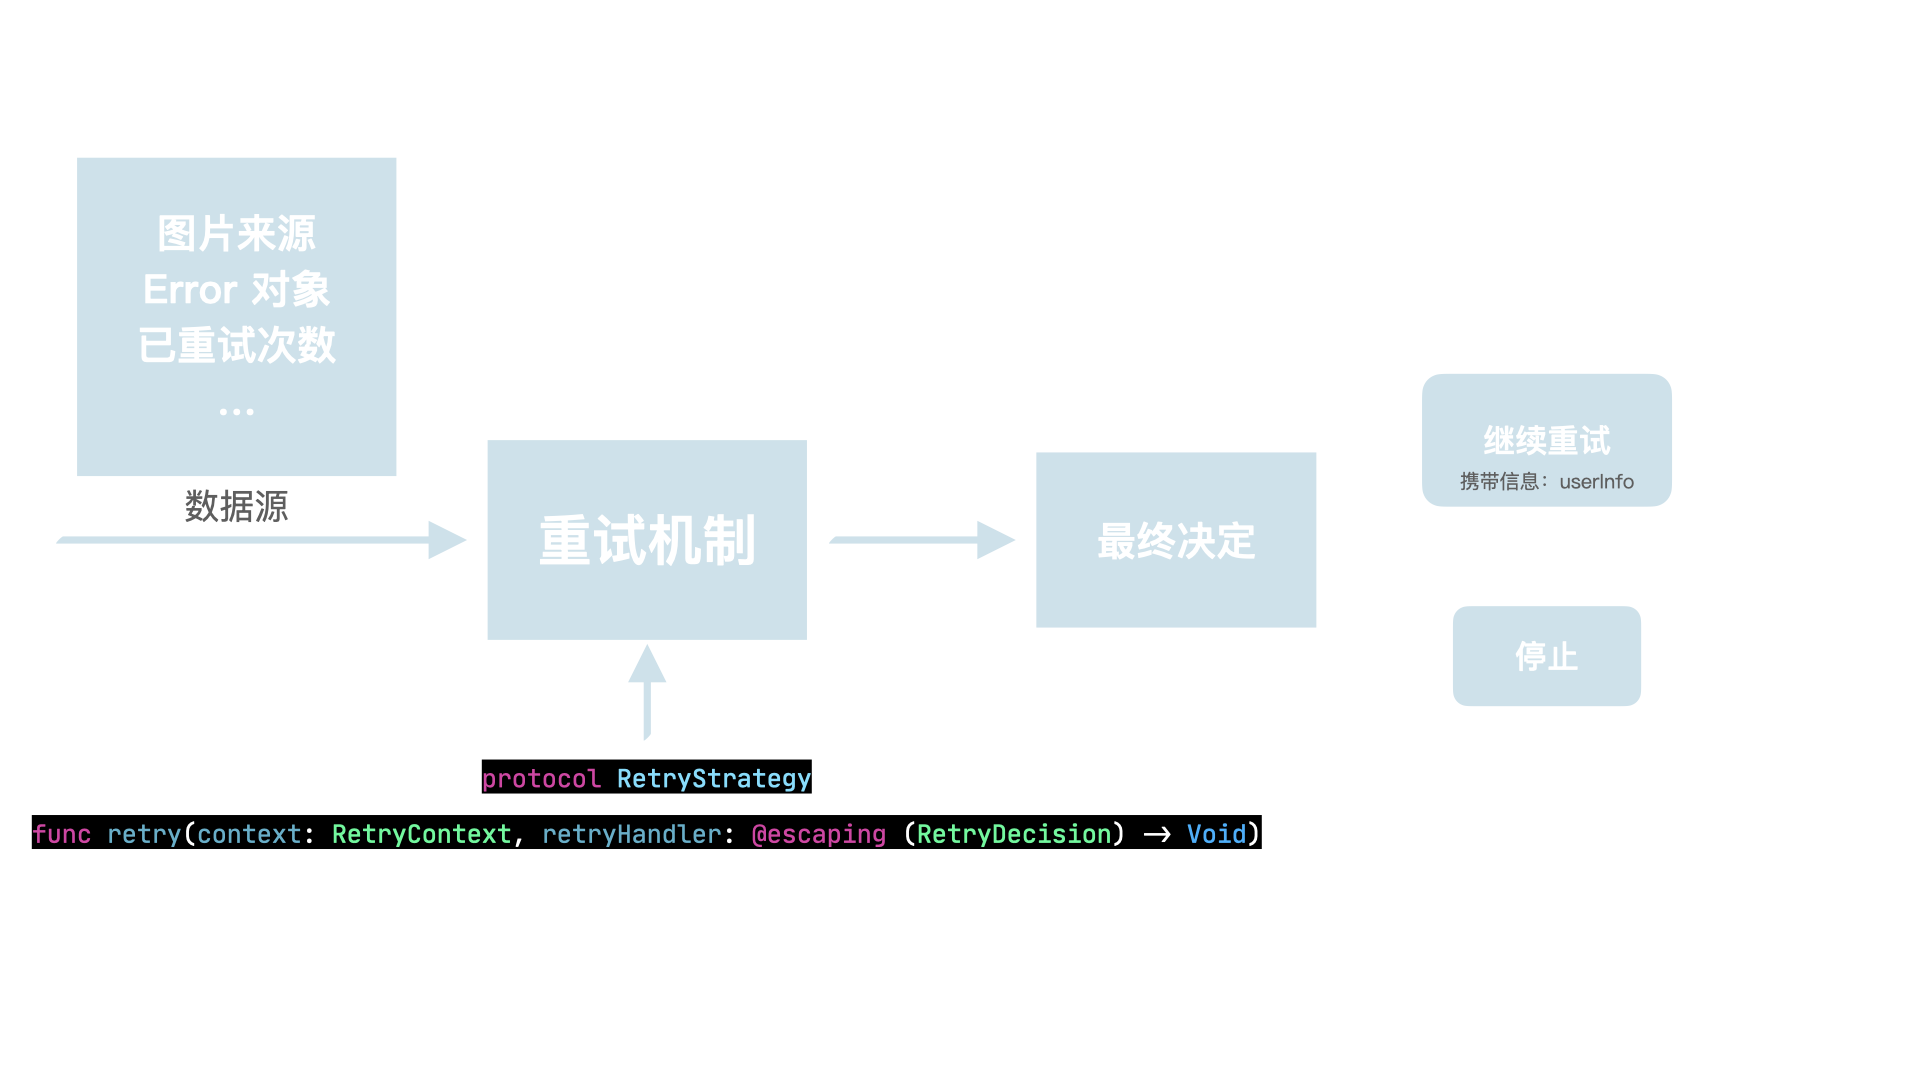
Kingfisher 设计一个 RetryStrategy 协议,由遵循该协议的对象来作出决定(RetryDecision)。RetryDecision 有两种:继续重试和停止重试。
遵循 RetryStrategy 协议的对象内部设计了三种重试模式:
public struct DelayRetryStrategy: RetryStrategy {

    public enum Interval {
        case seconds(TimeInterval) // 指定 n 秒后重试
        case accumulated(TimeInterval) // 指定 n 秒以累加的方式重试,例如第一次为 3s 后重试,第二次就是 6s 后重试,以此类推。
        case custom(block: (_ retriedCount: Int) -> TimeInterval) // 告诉你已经重试的次数,自行决定几秒后进行重试

        func timeInterval(for retriedCount: Int) -> TimeInterval {
            let retryAfter: TimeInterval
            switch self {
                case .seconds(let interval):
                retryAfter = interval
                case .accumulated(let interval):
                retryAfter = Double(retriedCount + 1) * interval
                case .custom(let block):
                retryAfter = block(retriedCount)
            }
            return retryAfter
        }
    }

    ...
    ...

}
其核心方法实现如下:
public func retry(context: RetryContext, retryHandler: @escaping (RetryDecision) -> Void) {
    // 超过最大重试次数后,停止重试
    guard context.retriedCount < maxRetryCount else {
        retryHandler(.stop)
        return
    }

    // 当出错原因是用户取消该任务时,不进行重试
    guard !context.error.isTaskCancelled else {
        retryHandler(.stop)
        return
    }

    // 仅在网络请求响应出错时,进行重试
    guard case KingfisherError.responseError = context.error else {
        retryHandler(.stop)
        return
    }

    // 根据当前所使用的重试策略,结合当前已重试次数,计算出 interval 秒后进行重试
    let interval = retryInterval.timeInterval(for: context.retriedCount)
    if interval == 0 { // 立即进行重试
        retryHandler(.retry(userInfo: nil))
    } else {
        // 延迟 interval 秒后,提交重试任务。
        DispatchQueue.main.asyncAfter(deadline: .now() + interval) {
            retryHandler(.retry(userInfo: nil))
        }
    }
}
委托模式
iOS 开发者最熟悉的设计模式之一就是 Delegate,常见于 UITableViewDelegate 等。
平时自定义的类有时也需要把某个方法的实现委托给另一个类去实现。
例如,Task 的 finish(taskID: String) 方法需要交给外部去实现:
class Task {
    var onFinished: ((String) -> String?)?

    func finish(taskID: String) {
        let string = onFinished?(taskID)
        print(String(describing: string))
    }
}

class KFViewController: UIViewController {
    let subtaskAmount = 3
    override func viewDidLoad() {
        super.viewDidLoad()

        let task = Task()
        task.onFinished = { [weak self] taskID in
            guard let self = self else {
                return nil
            }

            let string = "Task \(taskID) is finished, the number of subtasks is \(self.subtaskAmount)"
            return string
        }
        // 输出:Optional("Task 123 is finished, the number of subtasks is 3")
        task.finish(taskID: "123")

        ...
        ...
这样的写法是可行的,但每次必须记得在 onFinished 闭包中弱引用 self 以免出现循环引用的问题,导致内存泄漏。
Kingfisher 中有这样一个好用的工具类:class Delegate<Input, Output>:
public class Delegate<Input, Output> {
    public init() {}

    private var block: ((Input) -> Output?)?
    public func delegate<T: AnyObject>(on target: T, block: ((T, Input) -> Output)?) {
        self.block = { [weak target] input in
            guard let target = target else { return nil }
            return block?(target, input)
        }
    }

    public func call(_ input: Input) -> Output? {
        return block?(input)
    }

    public func callAsFunction(_ input: Input) -> Output? {
        return call(input)
    }
}
借助这个工具类,让我们看看优化后的版本:
class Task {
    var onFinished = Delegate<String, String>()

    func finish(_ taskID: String) {
        let string = onFinished.call(taskID)
        print(String(describing: string))
    }
}

class KFViewController: UIViewController {
    let subtaskAmount = 3
    override func viewDidLoad() {
        super.viewDidLoad()

        let task = Task()
        task.onFinished.delegate(on: self) { (self, taskID) in
            let string = "Task \(taskID) is finished, the amount of its subtask is \(self.subtaskAmount)"
            return string
        }

        task.finish("123")
        ...
        ...
下面第二个 self 已是弱引用后的版本,无需每次得加 weak 关键字了。
task.onFinished.delegate(on: self) { (self, taskID) in
再者,把匿名函数(Closure)包装成一个 Delegate 对象使用使得代码更加清晰。
提问 1:为啥 onFinished.call(taskID) 返回的是可选类型 String?
// 这里的泛型约束明明是 String 类型
var onFinished = Delegate<String, String>()
因为 Delegate 内部实现是弱引用 self,所以 self 处于一种可能有可能没有的状态,这就导致返回值的类型均是可选类型的了。
提问 2: 如果把 Output 泛型约束为可选类型,那返回值类型不就是可选的可选类型(??)吗?
public class Delegate<Input, Output> {
    public init() {}
    private var block: ((Input) -> Output?)?
    ...
    ...
Kingfisher 已对这种情况做了处理:
extension Delegate where Output: OptionalProtocol {
    // 此时 Output 的类型为可选类型
    public func call(_ input: Input) -> Output {
        if let result = block?(input) {
            return result
        } else {
            return Output._createNil
        }
    }

    public func callAsFunction(_ input: Input) -> Output {
        return call(input)
    }
}

public protocol OptionalProtocol {
    static var _createNil: Self { get }
}
extension Optional : OptionalProtocol {
    public static var _createNil: Optional<Wrapped> {
         return nil
    }
}
当 Output 类型为可选类型时,新增一个直接返回 Output 的 call 方法。
Kingfisher 还使用了 Swift callAsFunction 的新特性,这意味着可以无需再调用 call 方法,如:
class Task {
    var onFinished = Delegate<String, String>()

    func finish(_ taskID: String) {
//        let string = onFinished.call(taskID)
        /// 利用 callAsFunction 的特性
        let string = onFinished(taskID)
        print(String(describing: string))
    }
}
CacheCallbackCoordinator
顾名思义就是缓存模块内的异步回调方法的协调器。
// 是否需要缓存原始图片
let needToCacheOriginalImage = options.cacheOriginalImage &&
options.processor != DefaultImageProcessor.default

let coordinator = CacheCallbackCoordinator(
    shouldWaitForCache: options.waitForCache, shouldCacheOriginal: needToCacheOriginalImage)
let result = RetrieveImageResult(
    image: options.imageModifier?.modify(value.image) ?? value.image,
    cacheType: .none,
    source: source,
    originalSource: context.originalSource
)
// Add image to cache.
let targetCache = options.targetCache ?? self.cache
targetCache.store(
    value.image,
    original: value.originalData,
    forKey: source.cacheKey,
    options: options,
    toDisk: !options.cacheMemoryOnly)
{
    _ in
    coordinator.apply(.cachingImage) {
        completionHandler?(.success(result))
    }
}

if needToCacheOriginalImage {
    let originalCache = options.originalCache ?? targetCache
    originalCache.storeToDisk(
        value.originalData,
        forKey: source.cacheKey,
        processorIdentifier: DefaultImageProcessor.default.identifier,
        expiration: options.diskCacheExpiration)
    {
        _ in
        coordinator.apply(.cachingOriginalImage) {
            completionHandler?(.success(result))
        }
    }
}

coordinator.apply(.cacheInitiated) {
    completionHandler?(.success(result))
}
有两个布尔值在控制 completionHandler?(.success(result)) 执行的时机,它们分别是:
- 是否需要缓存原始图片(needToCacheOriginalImage)
- 是否等待缓存过程结束(shouldWaitForCache)
在这两个变量的排列组合下,Kingfisher 需要确保该回调执行的次数有且只有一次!
因此,CacheCallbackCoordinator 内部维护了一个包含四种状态的枚举 State、导致状态发生转移的三种 Action,以及描述状态是如何转移的 apply 方法:
enum State {
    case idle
    case imageCached
    case originalImageCached
    case done
}

enum Action {
    case cacheInitiated
    case cachingImage
    case cachingOriginalImage
}

func apply(_ action: Action, trigger: () -> Void) {
    switch (state, action) {
        case (.done, _):
        break

        // From .idle
        case (.idle, .cacheInitiated):
        if !shouldWaitForCache {
            state = .done
            trigger()
        }
        case (.idle, .cachingImage):
        if shouldCacheOriginal {
            state = .imageCached
        } else {
            state = .done
            trigger()
        }
        case (.idle, .cachingOriginalImage):
        state = .originalImageCached

        // From .imageCached
        case (.imageCached, .cachingOriginalImage):
        state = .done
        trigger()

        // From .originalImageCached
        case (.originalImageCached, .cachingImage):
        state = .done
        trigger()

        default:
        assertionFailure("This case should not happen in CacheCallbackCoordinator: \(state) - \(action)")
    }
}
有了这些,便可以画出一个有限状态机的状态转移图: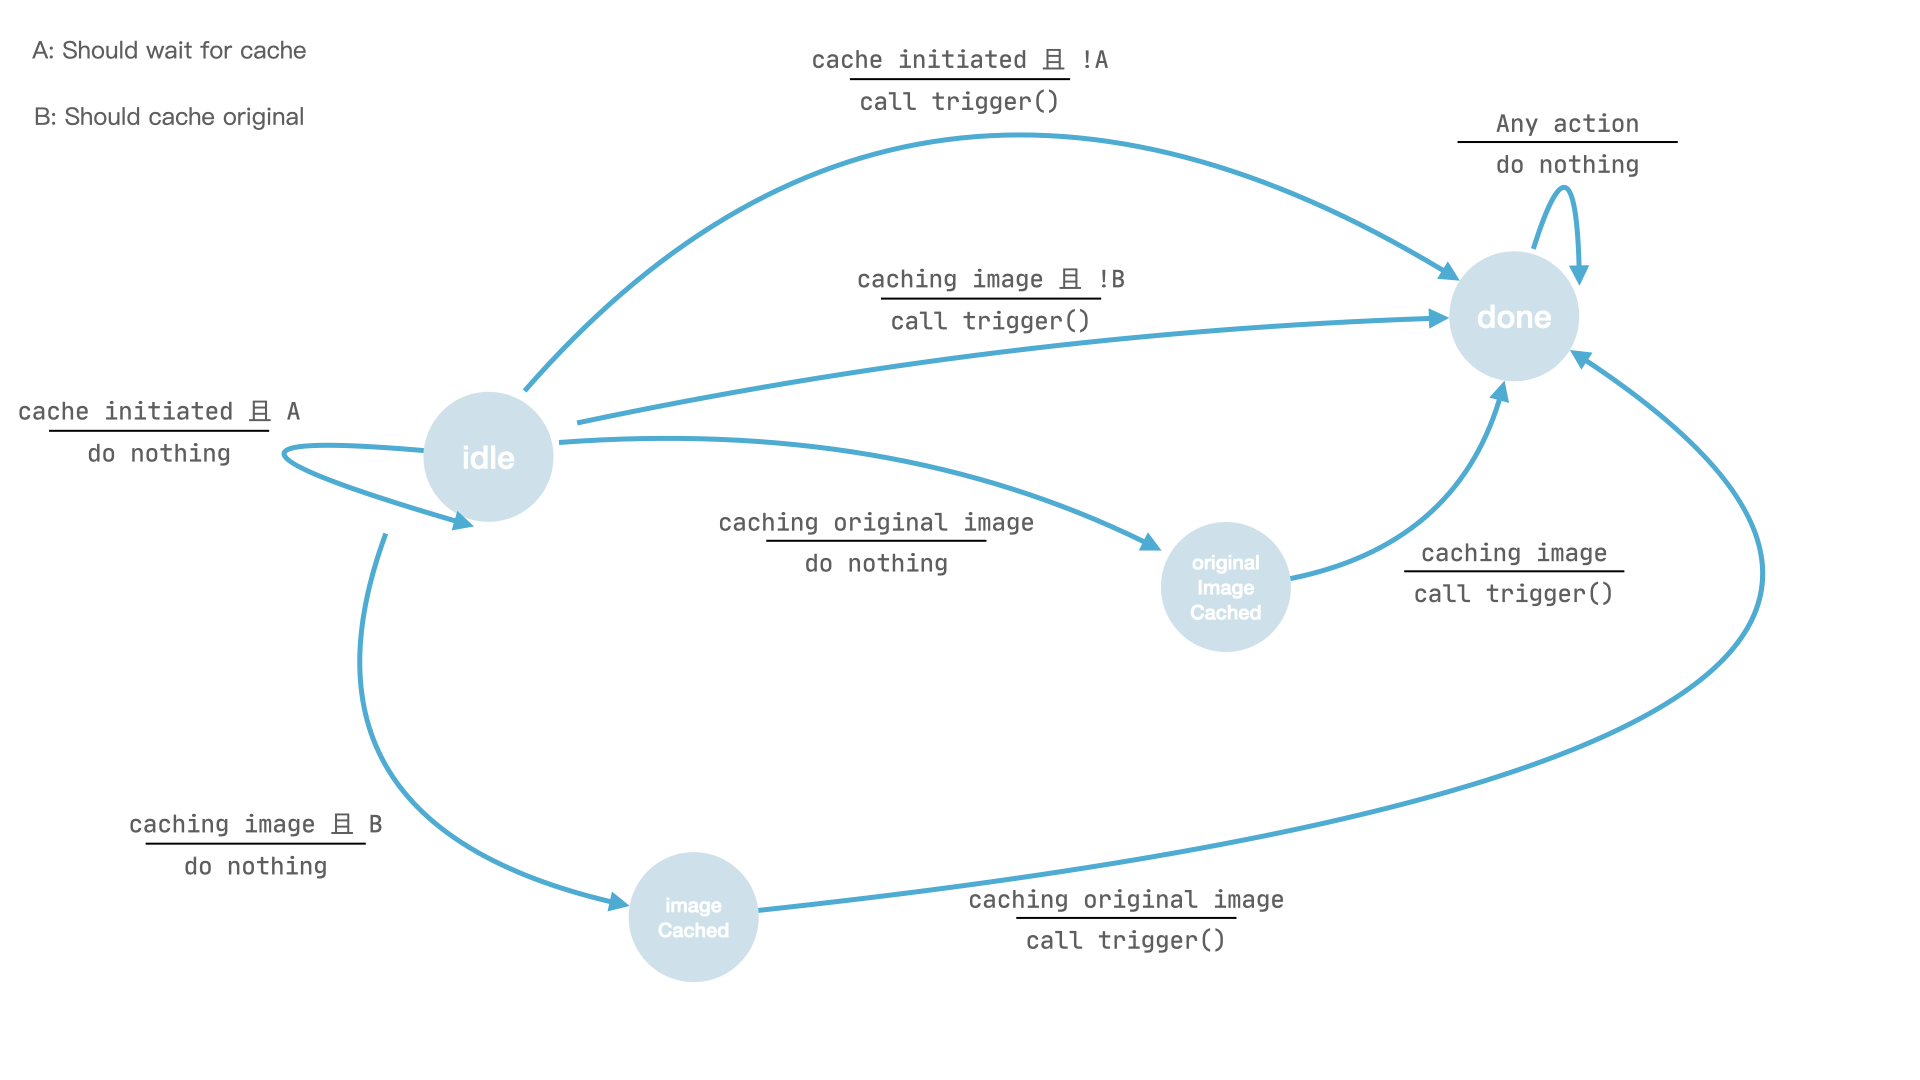
从图中可以看出:在从 idle 状态到 done 状态的任意一条路线上,trigger 方法的执行次数有且只有一次!这样设计的代码清晰,也容易测试,是很值得学习的案例了!
结语
读 Kingfisher 源码要分享的第一部分就到此结束了,还有图片下载流程、图片处理流程、对多平台的支持(Kingfisher 还支持 watchOS、tvOS 和 macOS)等。
这也是我第一次比较认真地花大段时间仔细读开源代码,收获颇丰。
就这样慢慢进步吧!